Lesson 1 — Defining What Matters: Problem Framing for AI Initiatives
Module 3, Unit 1 | Lesson 1 of 3
🧭 Welcome to Module 3. This is the planning module — where everything is prepared to build the solution and solve the business problem. The discipline of this module is that planning is not a guessing game. The risks an AI initiative will face, the resistance it will meet, the costs that will balloon at scale, and the assumptions that will quietly fail are not new. Every one of them has been documented in the experience of similar organisations, in regulator reports, in published case studies, and in the institutional memory of the people doing this work. Module 3 trains you to use that evidence to anticipate problems and prepare mitigations rather than to react to surprises later.
A note that recurs throughout: a project completed substantially under budget is not a great project — it is a poorly planned one that held resources hostage when other initiatives could have been running concurrently and solving other problems. Under-budget is as much a planning failure as over-budget. The same principle applies to impact: it is not enough to estimate value optimistically — the impact pathway must be traceable, the metrics must be falsifiable, and the assumptions must be documented.
📁 Module 3 Project
Module 3 covers the planning and management phases of the portfolio. By the end of the module, you will have produced every section that frames, scopes, evaluates, plans, and prepares the initiative for delivery — in the order the portfolio asks for them, with the analytical discipline behind each section that allows it to stand up to a sceptical review. The implementation, critical overview, and recommendations sections come later in the programme, once the initiative has actually run and there is real evidence to reflect on.
The Module 3 Project workbook is an important piece of work because it accompanies you through the rest of the programme. Use it as the central place to gather your project evidence, develop each portfolio section, and bring in useful elements from previous and future modules.
By the end of this lesson, you will be able to:
- Define a business problem in measurable terms and distinguish it from operational frustration (K7, K13)
- Apply 5 Whys and the Fishbone diagram to diagnose causes, then use the Impact vs Effort Matrix to prioritise what to act on first (K13, S3)
- Write a neutral problem statement that captures current state, gap, impact, and decision context (K7, S4)
- Evaluate alternative interventions before committing to AI, and articulate a measurable goal statement (K24, S5, B1, B3)
Why this comes before the project plan
Most failed AI projects do not fail at the build stage. They fail much earlier — at the moment a leadership conversation about "doing something with AI" turns into a vendor demo before anyone has agreed what problem the technology is meant to solve.
This is the pattern that produces what the Department for Science, Innovation and Technology calls "digital drift": real money spent, no measurable improvement. It happens when enthusiasm leads reasoning, when the irritation of a manual task is mistaken for a business problem, and when the project team retrofits a definition of the problem to whichever tool they have already started to favour.
Module 1 taught you to identify candidates for automation. Module 2 taught you to think about the people affected. This module is about the discipline that sits between those two — the work of framing, scoping, and pressure-testing an initiative before resources are committed. The first piece of that discipline is being clear about what the problem actually is.
What counts as a business problem
A business problem is a measurable gap between current performance and a clearly defined desired state, with consequences that can be expressed in cost, risk, service quality, compliance, workforce strain, or strategic delivery.
That definition does a lot of work, so it is worth pulling apart.
Measurable gap. "We process invoices manually" is not a problem. "Our invoice validation takes six days on average, costs £180,000 a year, and produces a 9% error rate" is. The first describes a way of working; the second describes a performance state with numbers attached. Without numbers, you cannot prove improvement later — which means you cannot evidence the value of any intervention you make.
Material consequences. A frustration becomes a problem when its impact can be quantified — even roughly. If you cannot yet attach numbers, the right response is not to abandon the framing; it is to be explicit about what data you would need and how you would gather it. Acknowledging that gap honestly is more credible than inventing certainty.
Not the same as a solution. "We need an AI tool to process invoices" is a proposed solution masquerading as a problem. The problem is the six days, the £180,000, and the 9% error rate. Whether AI is the right response is a separate question — and one that should be answered last, not first.
🔑 Key term: Solution bias — the tendency for teams to commit to a preferred intervention (often a specific tool or vendor) before the underlying problem has been clearly defined, and then to retrofit their problem framing to justify that commitment.
When formal definition is required
You do not need a formal problem statement for every conversation about a frustrating process. You do need one whenever an initiative is about to consume meaningful organisational resources — time, budget, leadership attention, or reputational capital.
A useful warning sign: the conversation has drifted to features, suppliers, and procurement before anyone has agreed on the measurable performance gap. That drift is the moment to slow the discussion down — not because caution is virtuous, but because acting without clarity is the most expensive thing you can do.
💬 Reflection
Think about the AI initiative you are bringing into this module. If a colleague asked you "what problem are we solving?" right now, could you answer in a sentence containing at least one number? If not, that is the first thing to fix.
Root cause analysis: from what to why
Defining the problem tells you what is wrong. Root cause analysis (RCA) tells you why it is happening — and whether the cause you are about to address is actually the cause, or just the symptom you can most easily see.
This matters in AI projects more than most, because automation has a particular failure mode: it can speed up a process that should not exist in the form it does, and lock in the underlying dysfunction by making the workaround harder to remove.
AI initiative teams need a small toolkit covering both diagnosis and prioritisation. The 5 Whys drills into a single causal chain. The Fishbone (Ishikawa) diagram maps the wider field of contributing factors. The Impact vs Effort Matrix then takes those factors and decides which to act on first. They form a natural progression: diagnose with 5 Whys or Fishbone (or both), then prioritise with Impact vs Effort. Choose the diagnostic method that fits the shape of the problem — the matrix follows.
The 5 Whys
Ask "why?" five times in sequence. Invoices contain errors → because data entry is inaccurate → because input fields are unclear → because a policy change wasn't reflected in the form → because no one consulted the operations team when the policy changed. Best for relatively linear problems where a quick, disciplined diagnosis is enough.
Strengths. Fast, no specialist training required, surfaces the structural cause when the team is willing to push past the first plausible answer. Works well for problems with a single causal chain. The discipline is in the asking — every "why" is testable, and any link in the chain can be challenged. It is a habit, not a method, and the simplest of the three to embed in a team's everyday operations.
Limitations. Only as good as the line of questioning. If the team stops too early, the result is a fix to a symptom dressed up as a fix to a cause. Single-line thinking also misses problems with multiple interacting causes — for those, the Fishbone diagram is better. Different starting "whys" can produce different chains, so the conclusion can depend on who runs the session.

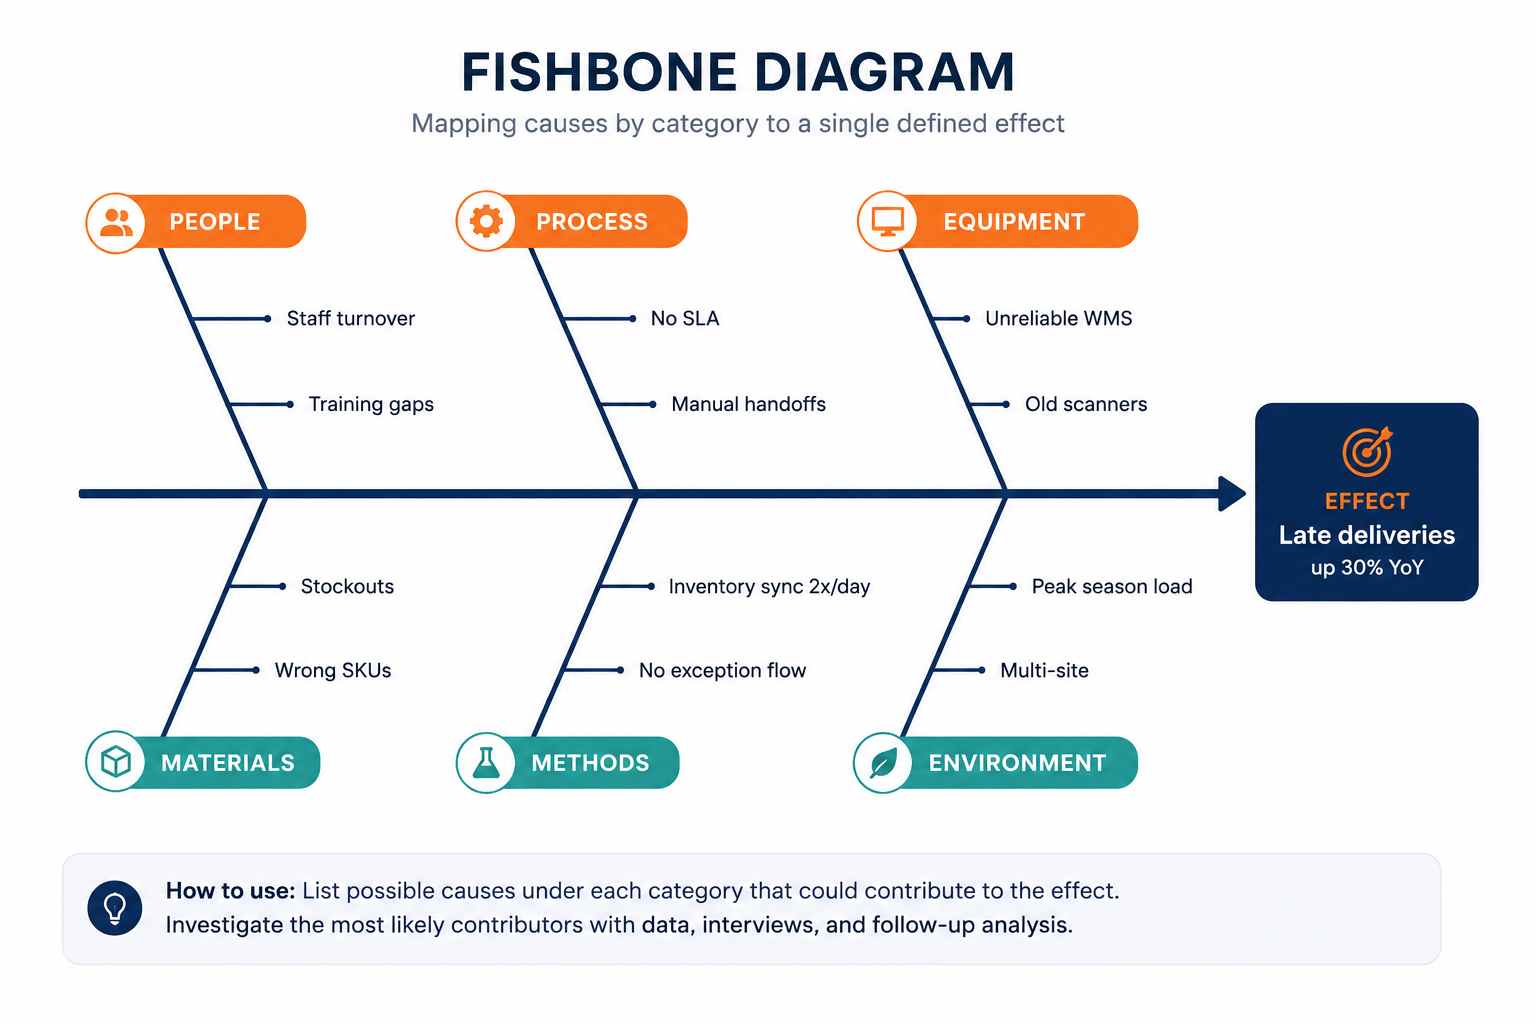
Fishbone (Ishikawa) diagram
Maps possible contributing causes across structured branches — typically People, Process, Technology, Governance, Data, and Environment. Useful when a problem cuts across departments or when there is genuine disagreement about who is responsible. Forces breadth before depth.
Strengths. Surfaces all the contributing factors in one view, which is particularly valuable when responsibility is contested across teams — the visual makes it harder for any one function to deflect blame to another, and easier for the project team to commit to interventions across multiple categories at once. Excellent as a workshop tool because it is inherently participatory: each branch invites contributions from the people closest to it.
Limitations. Identifies factors but does not inherently prioritise them — every branch can look equally plausible until you do further analysis (data review, interviews, follow-up testing). Without that follow-up, a fishbone can become a list of grievances rather than a diagnosis. The categories are also conventional; if your problem does not map cleanly onto People/Process/Technology, the diagram can force you into the wrong shape.
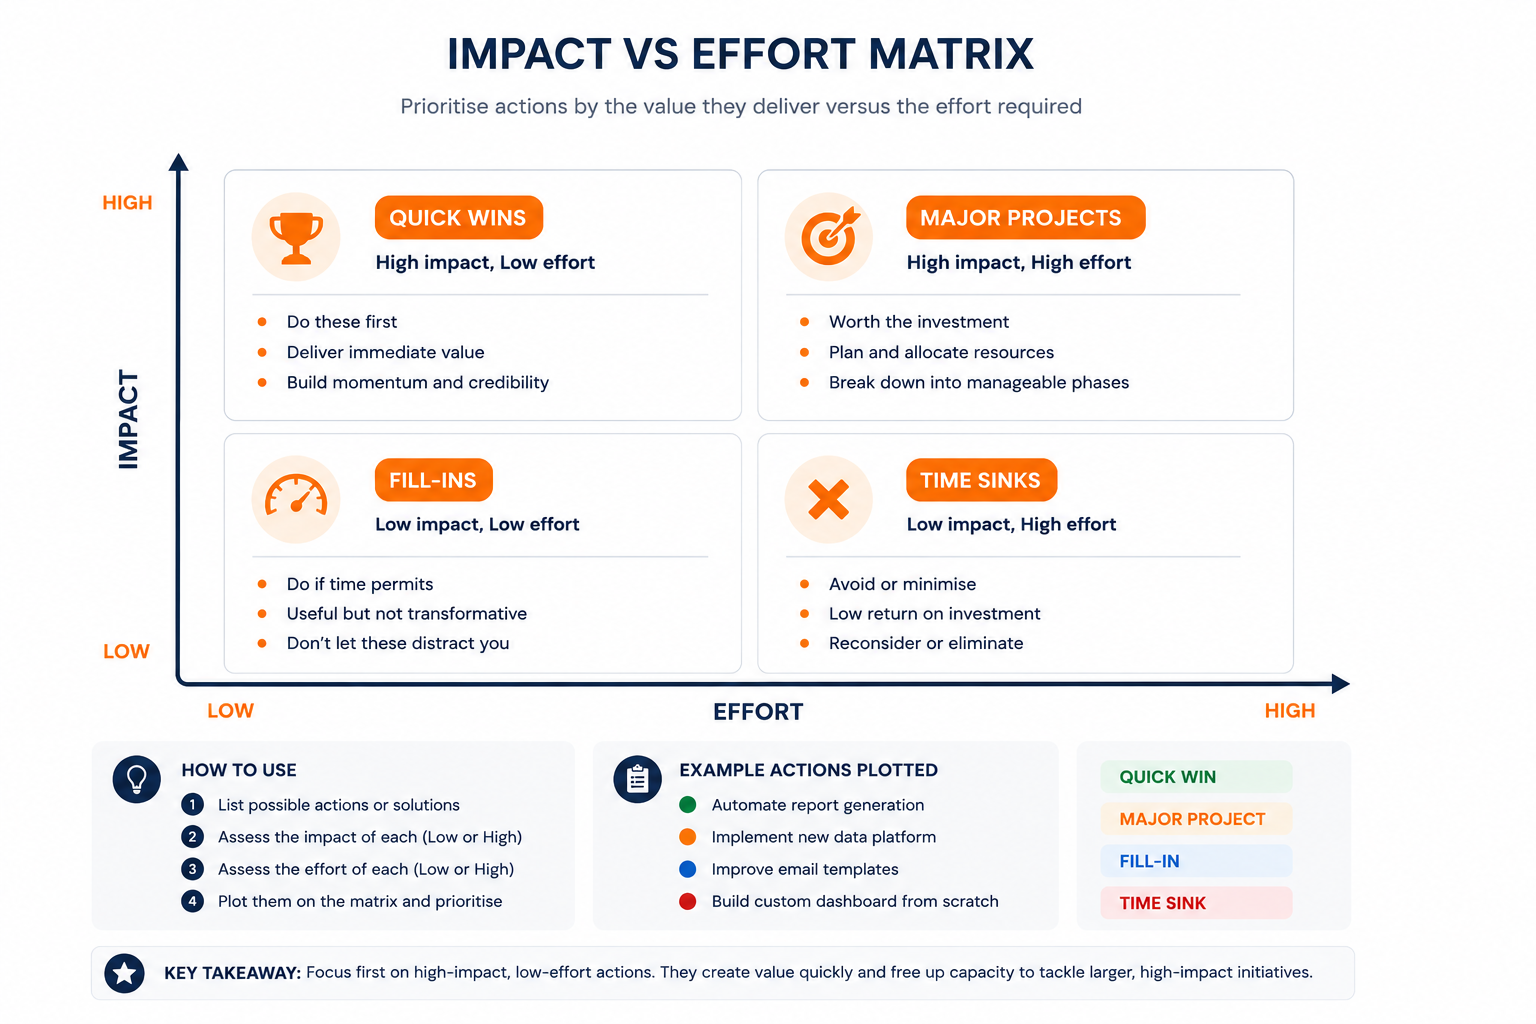
Impact vs Effort Matrix
Once a 5 Whys or a Fishbone has surfaced contributing factors, you usually have more candidate fixes than you can sensibly act on at once. The Impact vs Effort Matrix is a quick prioritisation tool that helps the team decide where to focus first. Every candidate fix is plotted on a simple 2x2 — high or low impact, high or low effort — and the four quadrants suggest different actions: quick wins (high impact, low effort) are done first; major projects (high impact, high effort) are planned and resourced properly; fill-ins (low impact, low effort) are picked up when there is spare capacity; avoid (low impact, high effort) are ones where cost outweighs benefit.
Strengths. Fast, intuitive, visual; works as a workshop tool for mixed audiences (technical and non-technical). Forces the team to confront resource trade-offs explicitly rather than try to fix everything. Particularly useful when stakeholders disagree about priorities — placing items on the grid in front of everyone makes the disagreement testable: which axis are you actually disagreeing about, impact or effort?
Limitations. Can oversimplify strategic dependencies — sometimes a "low impact" fix is a prerequisite for a high-impact one, and the matrix does not show that linkage. Impact and effort scoring is also subjective; in workshops, dominant voices can move items between quadrants without evidence. Use the matrix to start the conversation about prioritisation, not to end it — and pair it with the assumption documentation discipline you will meet again in Unit 3 budget work.
Comparing the three methods
Use this table as a quick selector. Method choice is a judgement call, not a checklist — but if your problem fits cleanly into one row's Ideal For, that is the method to start with.
| Method | Ideal For | Complexity | Time Required | Team Size | Primary Benefit | Main Limitation |
|---|---|---|---|---|---|---|
| 5 Whys | Linear problems with a single causal chain | Low | Minutes to hours | Individual to small team | Speed and simplicity | May stop at the first plausible answer |
| Fishbone diagram | Multi-factor problems where responsibility cuts across departments | Medium | Hours to days | Small to medium team, cross-functional | Surfaces all contributing factors in one view | Identifies factors but does not inherently prioritise them |
| Impact vs Effort Matrix | Prioritising actions after the causes have been identified | Low | Minutes to hours | Individual to medium team | Focuses resources on the highest-value actions first | Can oversimplify strategic dependencies |
What if you are not really solving a problem? Gap Analysis
Not every AI initiative starts from a problem. Sometimes the work is not to fix what is broken but to close the distance between where the organisation is now and where it wants to be — capturing an opportunity, raising performance, or building a capability the organisation has decided it needs. In those cases, a root cause analysis can feel forced: there is no fault to drill into, just a difference between current state and desired state.
Gap Analysis is the right tool for this kind of work. It compares the as-is (the current operational reality) with the to-be (the desired future state) and asks: what is the gap, and what would need to change to close it? Unlike RCA, gap analysis is forward-looking — its starting point is the destination, not the symptom.
In an AI initiative, gap analysis often surfaces where AI could plausibly contribute before a problem has crystallised. "We currently respond to customer queries within 24 hours; we want to respond within 2 hours, with consistent quality across all channels." That is a gap statement. The intervention design — AI, process change, headcount, training, or some combination — comes after the gap is articulated, not before.
Strengths. Forward-looking and opportunity-led; useful when no acute problem exists but improvement is possible. Forces the team to be explicit about the desired state, which is the step organisations most often skip — leaders agree something should be better without agreeing what better would actually look like. Maps cleanly into roadmaps and goal statements (which you will write in Unit 2). Works at any level — task, process, capability, or whole-organisation.
Limitations. Only as good as the to-be definition. A vague target ("better customer experience") produces a vague gap and a vague intervention. Gap analysis can also mask the underlying why — a performance gap may exist because of a root cause that is more important than the gap itself, in which case starting with gap analysis would lead to optimising the wrong thing. The discipline is to ask: is this a gap to close, or a symptom of a root cause we should be addressing first?

A useful rule of thumb. If you can name a failure, an incident, or a measurable degradation — start with RCA. If you can name a desired state but no acute fault — start with Gap Analysis. Sophisticated initiatives often need both: a gap analysis to articulate the destination, and a root cause analysis to make sure you are not optimising around a problem that should be fixed instead.
Did you know?
The 5 Whys was developed at Toyota Industries in the 1930s by the company's founder, Sakichi Toyoda. It became a foundational habit of the Toyota Production System and is now used in everything from aviation incident reviews to software post-mortems at companies like Amazon and Netflix. Despite sounding almost childish, it has lasted nearly a century — partly because most teams, left to their own devices, stop asking "why?" at the first plausible answer.
The point is not to apply all three on every problem. A simple linear problem rarely needs more than the 5 Whys; a multi-factor problem benefits from a Fishbone; once factors are on the table, the Impact vs Effort Matrix tells you where to start. Method selection is itself part of professional judgement.
Doing this with AI
A general-purpose LLM is a useful interlocutor for a 5 Whys — particularly the bit humans are worst at, which is refusing to stop at the first plausible answer. Paste your problem statement into a model and ask it to ask you "why?" five times in succession, challenging weak or restating answers. Treat the model as a sparring partner, not an authority — the conclusions still need your evidence and judgement behind them.
Writing the problem statement
A problem statement is a short, neutral articulation of what you have defined and analysed. Four elements:
- Current state — what is happening, with evidence.
- Measurable gap — the distance between current and desired performance.
- Impact — quantified consequences (cost, time, risk, compliance, workforce).
- Decision context — what choice the organisation now needs to make.
A worked example: "Our current invoice validation process requires manual review of 100% of submissions. Average processing time is six days; annual cost is £180,000; error rate is 9%, causing rework and late supplier payment. A decision is required on whether process redesign and selective automation could reduce processing time below three days while maintaining compliance."
Notice what the statement does not do. It does not name a tool. It does not assume the answer is AI. It does not describe how anyone feels about the process. It is the kind of paragraph you could put in front of a governance board without flinching.
💬 Reflection
If you replaced "AI" or "automation" with "a non-technical process change" in your current project framing, would the problem statement still hold up? If not, you may be defining the problem around the solution rather than the other way round.
Evaluating options before committing
Once a problem is defined, the next discipline is to resist converging on an answer too quickly. Critical evaluation means generating at least three credible alternatives — including, importantly, at least one that does not involve AI — and examining them against consistent criteria: feasibility, cost over the lifecycle, risk, workforce impact, and strategic fit.
Two practices help. First, ask of each option: if this failed in two years, what would the failure look like? That question surfaces fragile dependencies that polite comparison tables tend to hide. Second, name trade-offs explicitly. Every credible option has them. A recommendation that pretends otherwise reads as advocacy, not analysis.
Where AI is one of the options, the evaluation must include explainability, auditability, and lifecycle considerations alongside cost and feasibility. A system you cannot explain or maintain is not a cheaper system — it is a deferred cost.
Doing this with AI
Option generation is where teams reliably miss alternatives — particularly non-AI ones, because the project started as an AI conversation. Give an LLM your problem statement and ask: "Generate five credible interventions that address this problem, including at least two that involve no automation. For each, name the most likely failure mode in two years' time." The output will not be your final list, but it will widen the option space you started with — which is the point.
From recommendation to goal statement
The output of this work is a short, specific recommendation paired with a measurable goal statement.
A goal statement converts the analysis into accountability. It defines what will improve, by how much, in what timeframe, and under what constraints — for example: "Reduce average invoice processing time from six days to three within six months of pilot launch, while reducing the error rate from 9% to under 4%, without compromising compliance."
"Improve efficiency" is not a goal statement. It cannot be measured, and what cannot be measured cannot be governed. Vagueness at this stage is not modesty; it is a refusal to be held to anything specific later.
Project Activity — Complete Part 1: defining the problem
Open the Module 3 Project workbook and complete Part 1, sections 1.1-1.5 for the AI initiative you will carry through the module.
- Complete 1.1 Introduction and 1.2 Situation with your organisation, department, role, and the operational situation that revealed the problem.
- In 1.3 Identify the problem, choose one root-cause method from this lesson and apply it to your own project. Show the analysis, not only the conclusion.
- In 1.4 Business problem statement, write a neutral statement that includes current state, measurable gap, impact, and decision context. Keep solution language out of it.
- In 1.5 Workflow map, paste your current-state workflow and mark where the pain, delay, cost, risk, or quality issue appears.
- Add one note on the evidence that would change your framing. That note will help you stay honest when the project becomes more persuasive later.
Project Checklist
- Sections 1.1 and 1.2 give the reader enough organisational context to understand the project.
- My situation describes observable or measurable evidence, not only frustration.
- My root-cause method is named, justified, and applied step by step.
- I have separated symptoms from the root cause or causes.
- My problem statement is neutral, measurable, and free of solution bias.
- My current-state workflow map shows where the problem occurs in the real process.
- I have noted the evidence or assumption that could change my interpretation.
⏭️ Up next — Lesson 2: With the problem framed and a recommended pathway in hand, Lesson 2 turns to the solution itself. You will examine the four AI solution archetypes — pre-built API, off-the-shelf product, fine-tuned foundation model, and custom build — and the structured way to evaluate which one actually fits your problem.